

notification-channel-compat
notification-channel-compat adds Notification Channel support to pre-Oreo Android devices
Starting in Android 8.0 (API level 26), all notifications must be assigned to a channel. For each channel, you can set the visual and auditory behavior that is applied to all notifications in that channel. Then, users can change these settings and decide which notification channels from your app should be intrusive or visible at all. You can read more about Notification Channels at https://developer.android.com/training/notify-user/channels
This is for the good and the bad. The bad; the user now has full control of the notifications settings, and developer cannot override them. The good; it frees developer of dealing with notification preferences, and easily allows multiple preferences for multiple channels.
As more and more users are upgrading to Android 8.0, developers have designed their apps around the channels requirement, and have started using it for their benefit. But as most developers are still supporting pre-8.0 devices, they also have to add preferences and logic to control the notifications for the older devices.
This is where notification-channel-compat appears. You use the same required coding as for the Android 8.0 built-in channel classes, with minimal change, to support channels in all devices. In Android 8.0 and later, it uses the built-in channel classes, and in pre-Android 8.0, it mimics them. Thus you have channels in all Android 4.0+ devices.
The following Screenshots are from an Android 7.0 device. As you can see, it mimics the system channel settings.
| Example Main | Example Menu | Channel All | Channel Single |
|---|---|---|---|
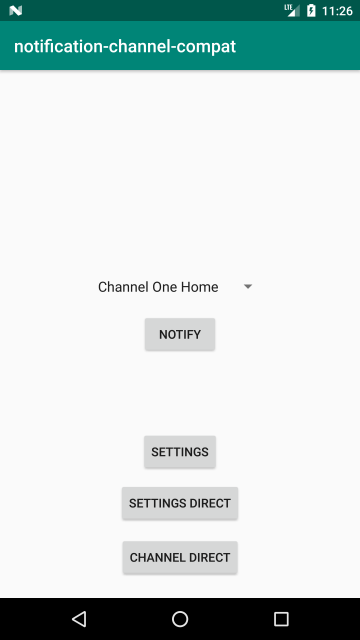 |  | 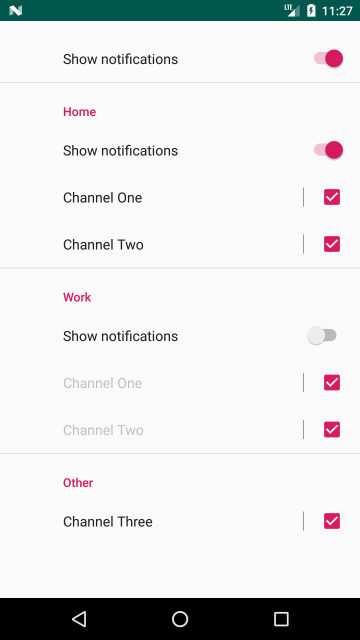 | 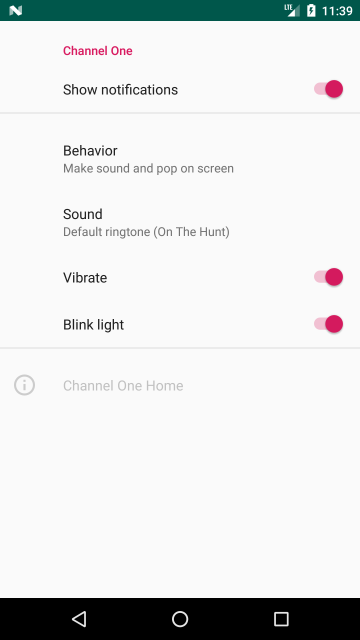 |
Usage
Step 1:
Add gradle dependecy
dependencies {
       implementation 'com.lionscribe.open:notification-channel-compat:1.0.4'
}
Step 2:
Use the following compat classes:
NotificationChannelCompat in place of NotificationChannel NotificationChannelGroupCompat in place of NotificationChannelGroup and use NotificationChannelManagerHelper to create the Channels and Groups, as follows;
NotificationManager notificationManager = (NotificationManager) getSystemService(NOTIFICATION_SERVICE);
NotificationChannelManagerHelper notificationManagerHelper = new NotificationChannelManagerHelper(this, notificationManager);

// If you want Groups, add them as follows
NotificationChannelGroupCompat group = new NotificationChannelGroupCompat("group_home", "Group Home");
group.setDescription("This is Group Home");
notificationManagerHelper.createNotificationChannelGroup(group);

// Now create the Channels
NotificationChannelCompat channel = new NotificationChannelCompat("channel_one_home", name, NotificationManager.IMPORTANCE_DEFAULT);
channel.setDescription("This is Channel One Home");
channel.setGroup("group_home");
// Register the channel with the system; you can't change the importance or other notification behaviors after this
notificationManagerHelper.createNotificationChannel(channel);
This should preferably be done in the onCreate function, so that channels are available right away to be shown in the preferences.
Step 3:
Add the channels preference to you menu. This way users can easily edit their channels. In Android 8.0 and later, this menu will take them to the System Channel preferences. In older devices, it will create its own menu to mimic the System settings. The following is an example that adds 2 preferences, one that takes user to main channels settings, and one that takes them to a specific channel's settings.
<PreferenceScreen
  xmlns:app="http://schemas.android.com/apk/res-auto">

    <SwitchPreferenceCompat
   app:key="test"
   app:title="Test Switch"/>

    <com.lionscribe.open.notificationchannelcompat.NotificationChannelPreference
   app:key="channel_settings"
   app:summary="Change your notification channel settings"
   app:title="All Channel Settings"  />

    <com.lionscribe.open.notificationchannelcompat.NotificationChannelPreference
   app:channelId="channel_one_home"
   app:key="channel_settings_channel_one_home"
   app:summary="Change your Channel One Home settings"
   app:title="Channel One Home Settings"  />

</PreferenceScreen>
Alternatively, you can directly open the preferences, with a call to the static function NotificationChannelPreference.launchSettings(context, null); or NotificationChannelPreference.launchSettings(context, channelId);
Step 4:
When showing a notification, just create it as usual, and add a single line of code,
if (NotificationChannelCompat.applyChannel(context, notification, channel_id)
and only show the notification if it returns 'true', as follows;
Notification notification = new NotificationCompat.Builder(context, "channel_one_home")
        .setSmallIcon(R.drawable.ic_notifications_active_black_24dp)
        .setContentTitle("Title")
        .setContentText("Text")
        .build();

if (NotificationChannelCompat.applyChannel(context, notification, "channel_one_home")) {
    NotificationManager notificationManager = (NotificationManager) context.getSystemService(NOTIFICATION_SERVICE);
    notificationManager.notify(index, notification);
}
You must add the if statement, otherwise the Channels will not work.
That's it, you now have working channels for all SDK 14+ devices.
Getting Help
To report a specific problem or feature request, open a new issue on Github.
Authors
- Lionscribe - Initial work - Lionscribe
See also the list of contributors who participated in this project.
License
This project is licensed under the Apache 2.0 License - see the LICENSE file for details